Why must the pile head be prepared before testing?
Pile head preparation is the step that puts the pile head into a condition where the instruments read values that reflect the true behavior of the pile. Both dynamic pile load testing (Dynamic Load Test, PDA) and the Seismic Integrity Test rely on stress waves traveling through the concrete. If poor concrete remains at the pile head, the wave reflects incorrectly right from the start.
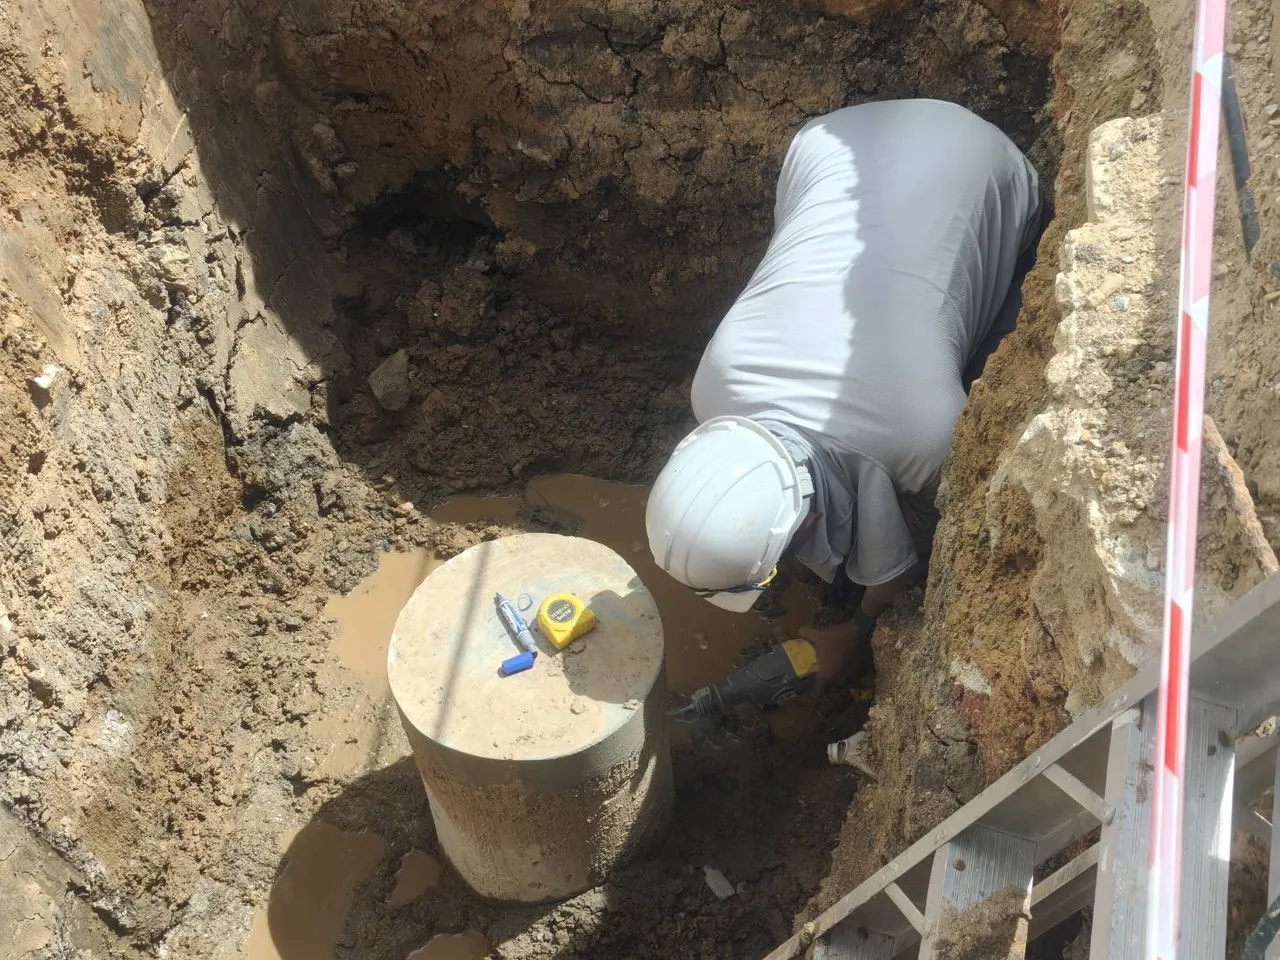
The concrete at the very top of a pile is almost always imperfect by the nature of the work. In bored piles it is the layer of laitance and sediment that floats up as the concrete displaces the drilling fluid during the pour; in driven piles it is concrete cracked by repeated hammer impacts during driving. In both cases it must be fully removed first.
The result of not preparing the pile head is not just inaccurate readings but a wasted trip: the test team arrives on site, cannot test, and has to rebook the whole visit, which adds travel and equipment mobilization costs.
How do you prepare a pile head for a Seismic Integrity Test?
The Seismic Integrity Test is the easiest of the three methods to prepare for, because it only needs sound concrete and a few small smooth spots. This test checks pile integrity with low-strain stress waves by striking the pile head with a hand-held hammer and measuring the reflected signal. The main standard is DPT 1551-51, with the test method per ASTM D5882-16; since ASTM withdrew this standard in 2025, cite it with its edition year.

What to prepare: break out the top concrete down to hard, sound concrete that sounds solid, not hollow, when tapped. Then grind the surface smooth at a minimum of 2 spots — one for the accelerometer and one for the hammer blow. The surface must be dry, with no standing water and no loose soil or concrete debris. Large-diameter bored piles are often tested at several positions on the cross-section, so ask the test team beforehand how many spots to prepare.
The pile head must stand above ground level or sit in an excavation wide enough for a person to get in, place the instruments and strike the pile comfortably. If the pile head is under water, pump it out first, because water on the surface keeps the sensor from seating firmly and distorts the signal.

How do you prepare a pile head for a PDA Test?
A PDA Test requires much stricter pile head preparation than the hand-hammer method, because the pile head takes real impacts from a drop weight and the gauges are bolted to the side of the pile. This test assesses pile load capacity by the dynamic (high-strain) method in accordance with DPT 1252-51 and ASTM D4945.

The clearest difference from the Seismic test is that the side of the pile must be exposed above the ground for a certain length, because the 2 strain transducers and 2 accelerometers are mounted in pairs on opposite faces of the pile shaft, not placed on the top surface. ASTM D4945 requires the gauges to be attached no less than 1.5 times the cross-section size (1.5B) below the pile head. In practice, the excavation around the pile is therefore usually about 1.5B–2.0B deep, with about 0.8 m of clear space around the pile face so a person can get in to install them. This depends on each project's specification, the pile size and the test team's installation method, so confirm with the team before excavating.
Preparation checklist for PDA:
- Break out to sound concrete — All cracked concrete or laitance at the top must be removed, leaving concrete that can take the impact without cracking again.
- Top surface smooth and square to the pile axis — If the surface is tilted, the impact lands asymmetrically, so the signals on the two sides differ to the point that they cannot be analyzed.
- Deal with protruding reinforcement — Cut or bend it so it does not obstruct the ram path or the pile cushion. Confirm with the design engineer before cutting, because these bars may be needed to tie into the pile cap.
- Clean side faces — The spots where the gauges will be drilled and bolted must be smooth concrete, free of adhering soil and not at a crack.
- Area around the pile head — It must be open wide enough for a piling rig or crane to set up the drop weight, and the ground must be firm enough to carry the machinery.
Concrete age matters just as much, because a pile head whose concrete has not yet gained enough strength risks cracking under impact. For details, see How many days after casting can a pile be tested? For bored piles, read more about the pile cushion and drop weight at Can PDA test bored piles?
How do you prepare a pile head for a Static Load Test?
A Static Load Test applies real load to the pile head and measures settlement, with reference to ASTM D1143/D1143M and DPT 1251. Preparation therefore focuses on making sure the pile head can take the compressive load without cracking and that the bearing surface is level and flat.
Generally, the pile is broken out to sound concrete and then capped with leveling concrete (capping) so the top is flat and square, spreading the load evenly over the cross-section. The area around the pile head must also be opened up so the loading system can be set up and the settlement gauges installed. Details of the load platform and clearances vary according to the design set by the responsible engineer.
The images below summarize all 3 methods. The 2D section shows a prepared bored pile head in an excavation that has been pumped dry, while the 3D model places 3 piles side by side, one for each test method. Note that every pile is broken out to sound concrete in the same way, but the smoothness of the top surface, the exposure of the side faces and what sits on the pile head differ by test method.
How does pile head preparation differ by method? A 3-method checklist
All 3 methods require breaking out to sound concrete and a dry pit. The differences: Seismic needs smooth spots only, PDA needs the whole cross-section smooth and square plus exposed side faces, and the Static Load Test needs the pile head capped level. The image below compares a pile head that is not ready for testing (left) with one that is (right), and the bottom strip summarizes the specific preparation for each method.
Not ready for testing
- Top concrete cracked and full of laitance, not yet broken out to sound concrete
- Soil still covers the pile head, so the pile sides cannot be reached
- Reinforcement protrudes and has not been cut or bent out of the test path
Ready for testing
- Broken out to sound concrete, with the top surface smooth and square to the pile axis
- Clean side faces, ready for drilling and mounting the PDA gauges
- Area around the pile head opened up, with water pumped out and soil cleared from the pit
← Scroll to see the full table →
| Preparation item | Seismic Integrity | PDA (Dynamic) | Static Load Test |
|---|---|---|---|
| Break out poor concrete to sound concrete | Required | Required | Required |
| Smooth surface at sensor spots only | Required | Not enough — full cross-section must be smooth | Not enough — full cross-section must be leveled |
| Top surface square to pile axis | Not required | Required | Required |
| Expose pile side faces for gauges | Not required | Required | Not required |
| Deal with protruding reinforcement | Only where it obstructs | Required | Per loading system design |
| Pump out water or clear soil from pit | Required | Required | Required |
| Access for machinery | Walk-in access is enough | Must carry piling rig or crane | Must carry platform and kentledge |
This table is a general guide. Follow the actual requirements the test team gives you before mobilizing to site, because pile size, pile type and site conditions can change the requirements.
Which mistakes force a test to be rebooked?
Most mistakes that force the test team to come back are the 5 basic issues below, and nearly all of them can be prevented by checking the pile heads before the appointment.
- Breaking out too shallow — Seeing concrete and assuming it is fine, but it still sounds hollow when tapped, meaning it has not reached sound concrete.
- Tilted top surface — Breaking out with a machine until the surface slopes, so the impact or compressive load is applied asymmetrically.
- Side faces not exposed for PDA — Only the top surface is prepared and soil is left around the pile, so the gauges cannot be mounted.
- Water ponding in the pit — Especially in the rainy season; keep a pump ready on site.
- Long protruding reinforcement in the way — It obstructs the pile cushion and the ram path and must be cut or bent first.
The simplest prevention is to talk to the test team 2–3 days ahead and send them photos of the pile heads before fixing the actual test date.
Who prepares the pile head, and does it cost extra?
Pile head preparation is the responsibility of the contractor or project owner, not the test team, and the cost of breaking out or excavating around the pile head is not included in the test price, in line with construction practice in Thailand. This work is concrete breaking and earthwork that uses the site's own equipment and labor, so the construction contract should state clearly who is responsible.
SPN's fees cover the testing only: PDA (Dynamic Load Test) starts at approximately THB 5,500 per pile and the Seismic Integrity Test is approximately THB 100-150 per pile, while a Static Load Test is approximately THB 50,000-150,000 or more per pile, depending on the test load and the loading system.
This price excludes travel and equipment mobilization costs, which are charged extra depending on the distance to site.
If you are not sure whether the pile heads on your site are ready for testing, send photos of them via LINE @spnth for the SPN engineering team to review first — we will assess them free of charge. See an overview of all our services on the pile testing services page.
This content explains general practice in pile head preparation for basic understanding only. The length of pile side to expose, the depth to break out and the acceptance criteria for each project must be set by the responsible engineer and stated directly in that project's specification.