The method is fast, can be repeated at the same spot, and leaves no damage on the structure, so it suits preliminary surveys and comparing concrete uniformity over large areas. For the step-by-step site procedure, see Rebound Hammer field test guide

How does a Rebound Hammer work?

A Rebound Hammer measures the energy rebounding from the concrete surface. Inside the instrument, a spring drives a hammer mass into a plunger held against the concrete surface. Part of the energy is absorbed by the concrete, and the rest makes the hammer mass rebound. This rebound distance is read as the Rebound Number (R value) on the instrument's scale.
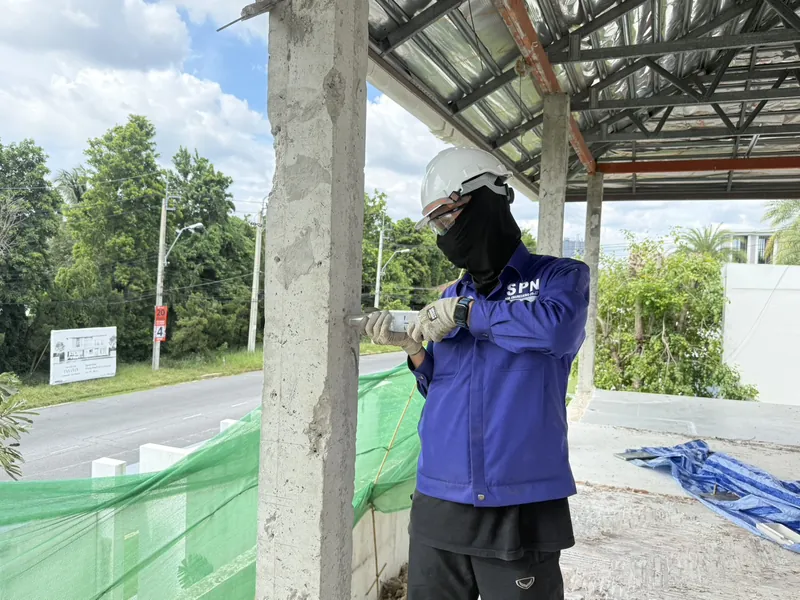
SPN engineer using a Rebound Hammer to test the surface of a concrete column horizontally on site
A Rebound Hammer fires a spring-loaded hammer at the concrete surface and reads the rebound (Rebound Number)

Hard, dense concrete absorbs little energy, so the hammer mass rebounds strongly and the R value is high; soft concrete or concrete with voids beneath the surface absorbs more energy, so the R value is low. The reading reflects only the surface condition to a depth of about 30 mm, and is then compared with a calibration curve to estimate compressive strength.

2D section showing how a Rebound Hammer works: a spring drives the hammer mass into the plunger on the concrete surface, and the rebound distance is measured as the Rebound Number Conceptual diagram. Top left is a longitudinal section of the rebound hammer held horizontally against a concrete surface. Inside the casing are the impact spring, the hammer mass and the plunger; on top of the instrument is a scale for reading the Rebound Number. An orange arrow shows the hammer mass striking, and a blue arrow shows the rebound, which is the value read. A light orange band at the concrete surface shows that the reading reflects only the hardness of the surface layer, about 30 millimeters deep. Bottom left compares two cases: hard, dense concrete absorbs little energy, so the hammer mass rebounds strongly and the R value is high; soft concrete or concrete with voids beneath the surface absorbs more energy, rebounds less and gives a low R value. The right panel shows three impact directions: horizontal on columns or walls, upward on slab or beam soffits, and downward on slab surfaces. Gravity assists or resists the rebound differently in each, so readings must be corrected per the instrument manual before comparison. The bottom strip summarizes three points: the result is a surface hardness index, not compressive strength itself; take at least 10 readings per test area and discard readings that differ from the mean by more than 6 units; and calibrate against Core Tests before converting to compressive strength. Rebound Hammer: impact → rebound → read R Not to scale Hammer section held on concrete surface Impact spring Drives mass to plunger R-value scale Rebound Number Surface ~30 mm is what R reflects Impact Rebound Hammer Mass Rebound varies w/ hardness Plunger Hold normal to surface Hard, dense concrete Rebound Low energy absorbed High rebound → high R Soft / voids below surface Rebound High energy absorbed Low rebound → low R Impact direction affects R Gravity aids or resists rebound Horizontal Column, wall, beam side Upward Slab/beam soffit Downward Slab top, footing Correct per manual before comparing directions and always log direction 1 Gives a "hardness index" not compressive strength 2 ≥ 10 readings per area Drop values >6 from mean 3 Calibrate vs Core Test before converting
Rebound Hammer principle in section: the hammer mass strikes the plunger and rebounds to give the R value, which indicates the hardness of the surface layer about 30 mm deep and must be corrected for impact direction

How do you read the Rebound Number?

The Rebound Number is a dimensionless value that must be averaged from several readings in the same test area, never concluded from a single impact. The reading principles under ASTM C805 are:

  • Take at least 10 readings per test area, with impact points at least about 25 mm apart and away from the edges of the member
  • Discard outliers: if any reading differs from the mean by more than 6 units, discard it and re-average the remaining readings
  • The resulting average is the representative R value of that area, used to compare with other areas or converted to an approximate compressive strength through a calibration curve

Why must readings be corrected for impact direction?

The direction in which the hammer is fired affects the R value, because gravity assists or resists the rebound of the hammer mass. Horizontal, upward and downward impacts give different readings, so a correction factor from the instrument manual must be applied to bring them onto the same basis before interpretation.

How accurate is a Rebound Hammer?

A Rebound Hammer gives an "estimate" of compressive strength and is less accurate than compression testing of specimens. Accuracy depends mainly on calibration: if the manufacturer's curve is used without calibrating against the actual concrete of the structure, the error may be large.

Engineers therefore often build a project-specific calibration curve by comparing R values with Core Test results on the same concrete, or use the Rebound Hammer together with UPV (the SonReb method), which reduces the error arising from the limitations of each method.

SPN technician using a Rebound Hammer on a prestressed concrete pile with a paper grid template marking the test points
Rebound Hammer testing on a prestressed concrete pile on site — a grid template sets the impact points so test points are distributed per the standard

What factors distort the readings?

The Rebound Number is sensitive to surface and environmental conditions because the instrument reads only surface hardness. Common factors that distort readings include:

  • Wet or damp surfaces give readings lower than actual
  • Carbonated surfaces of old concrete are harder than the interior and give readings higher than actual; check the carbonation depth as well
  • Plaster, paint or tiles must be chipped off to expose the concrete first
  • Large aggregate or voids beneath the test point make readings jump
  • Young concrete that has not fully hardened
3D model of a sample concrete wall with 5 types of Rebound Hammer impact points, showing surface conditions that distort the Rebound Number and the correct impact point (conceptual) Conceptual isometric view of a concrete wall panel standing on the ground, with a rebound hammer held perpendicular to the wall surface at five locations, each with a numbered tag. Location one is on plaster or paint that has not been removed, so the reading belongs to the finish, not the concrete. Location two is on a wet surface, giving readings lower than actual. Location three is the correct impact point: smooth, dry and exposed down to the concrete, with an engineer holding the hammer perpendicular to the surface. Location four has a large aggregate particle or a void beneath the impact point, making the reading jump abnormally. Location five is on old concrete with a carbonated surface; the section at the end of the wall shows the outer layer harder than the interior, giving readings higher than actual. The right panel summarizes all five causes and adds a sixth: young concrete that has not fully hardened. The bottom strip summarizes that the surface must be chipped and ground smooth before testing, must be dry, and that old buildings should be tested together with UPV and Core Tests. 3D model: which impact points distort R Not to scale Sample concrete wall, 5 impact cases 1 Plaster / paint 2 Wet surface 3 Correct point 4 Big stone / void 5 Carbonation Wall end section Harder outer skin Core What distorts R 1 Plaster, paint, tile Reads the finish 2 Wet or damp surface Reads too low 3 Smooth, dry, bare concrete Correct point 4 Large stone / void below Erratic jumps 5 Carbonation (old concrete) Hard skin, reads too high 6 Young concrete Not fully hardened Doubtful → confirm by UPV / Core Conceptual, not actual layout 1 Chip + grind smooth to bare concrete first 2 Surface must be dry avoid edges, corners, honeycomb 3 Old bldg: hard skin Use with UPV & Core
Conceptual 3D view: 4 surface conditions that distort R values compared with the correct impact point, which is smooth, dry and exposed down to the concrete

Summary table: Rebound Hammer vs other methods

The Rebound Hammer is the fastest but reads only the surface; UPV indicates the uniformity of the interior, and the Core Test gives actual compressive strength but requires drilling.

← Scroll to see the full table →

TopicRebound HammerUPVCore Test
MeasuresSurface hardness → approx. compressive strengthInterior uniformityActual compressive strength
DestructiveNoNoSemi-destructive
Depth representedSurface ~30 mmFull thicknessWhole core
VelocityVery fastMediumSlow (lab wait)
StandardASTM C805ASTM C597ASTM C42

In practice, the Rebound Hammer is therefore used to screen large areas first, and suspect spots are then confirmed by other methods. For an overview of all methods, see What NDT methods are there for concrete? For SPN's testing services with reports certified by a COE-licensed civil engineer, with signature and registration number, see Non-destructive structural inspection (NDE)